Gnocchi with cherry tomatoes and guanciale, the recipe

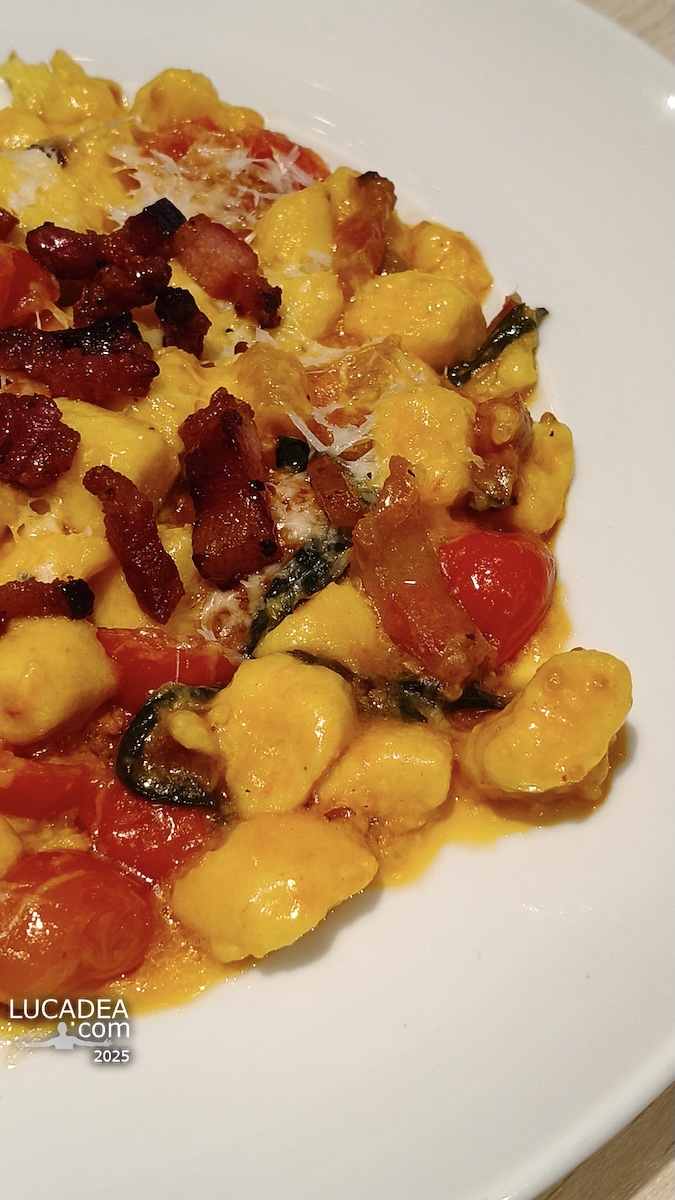
Gnocchi con pomodorini e guanciale serviti su piatto bianco con parmigiano e sugo cremoso in ambiente ristorante

Gnocchi with cherry tomatoes and guanciale, the recipe.
As soon as the plate arrived, the smell of gnocchi with cherry tomatoes and guanciale immediately caught my attention, even before I tasted it. Those fresh gnocchi with cherry tomatoes and guanciale looked simple but incredibly inviting, with the bright red sauce and the crispy pieces of guanciale on top. Sitting onboard the Costa Toscana, I realized that this dish would stay in my memory long after the trip.
Gnocchi with cherry tomatoes and guanciale is one of those dishes that perfectly represents Italian cuisine. It’s all about balance: the sweetness of the tomatoes, the rich flavor of the guanciale, and the creamy touch of parmesan at the end. If you are visiting Italy and wondering what to eat, this is definitely a place worth starting, a dish that shows how a few ingredients can create something truly satisfying.
I remember slowly cutting into the gnocchi with my fork, noticing how soft they were, almost melting into the sauce. The cherry tomato sauce wrapped around each piece, while the guanciale added that slightly crispy, savory contrast that made every bite more interesting. It reminded me of another dish I once shared on the blog, where simplicity and quality ingredients were enough to create something unforgettable.
There is also a small detail that makes a difference: guanciale, unlike bacon, comes from pork cheek and has a higher fat content, which gives the dish a deeper and more authentic flavor. That richness is exactly what ties everything together in this recipe.

Ingredients

– 500 g of fresh gnocchi;
– 200 g of cherry tomatoes;
– 120 g of bacon;
– 50 g of grated parmesan;
– extra virgin olive oil;
– salt;
– pepper.

Preparation

tart by preparing all the ingredients. Cut the guanciale into small strips or cubes, not too thin, so they stay slightly crispy on the outside and soft inside. Wash the cherry tomatoes and cut them in half.
Place a large pan over medium heat without adding oil. Add the guanciale to a cold pan and let it slowly release its fat as it heats up. This step is important to avoid burning and to achieve the right texture.
Cook the guanciale for about 5 to 7 minutes, stirring occasionally, until it becomes golden and slightly crispy. If there is too much fat, you can remove a small part, but keeping some will enhance the flavor of the sauce.
Add the cherry tomatoes to the pan and stir well. Let them cook for around 8 to 10 minutes on medium heat until they soften and release their juices, forming a light sauce. You can gently press some of them with a fork to make the sauce creamier. Add a small pinch of salt and some black pepper.
Meanwhile, bring a pot of salted water to a boil and cook the gnocchi. They will be ready when they float to the surface, usually after 2 to 3 minutes.
Using a slotted spoon, transfer the gnocchi directly into the pan with the sauce. Turn the heat to low and gently mix everything together for about 1 to 2 minutes. If needed, add a spoonful of cooking water to help bind the sauce.
Turn off the heat and add the grated parmesan cheese, stirring quickly to create a creamy consistency. This step should be done off the heat to prevent the cheese from clumping.
Serve immediately, finishing with a bit more black pepper or parmesan if you like. The contrast between the soft gnocchi, the fresh tomato sauce, and the crispy guanciale is what makes this dish so memorable.

Have you ever tried to recreate at home a dish you first tasted while traveling? Add a comment or go to the bottom of the site to read what other visitors have written.

Photos taken with Oppo Reno 12.

Add one  comment to this article or read  here what other visitors have written.
 
Adv
 
Disclamer

The rights on images, videos, choruses, text and all other material on the LUCADEA.com website are governed as per  Copyright page.


This page has been viewed 1 times today.
This month it has been viewed 1 times.
In total it has been viewed 2 times.
 

Đậu đũa xào thịt heo cooked at home in Italy, the recipe

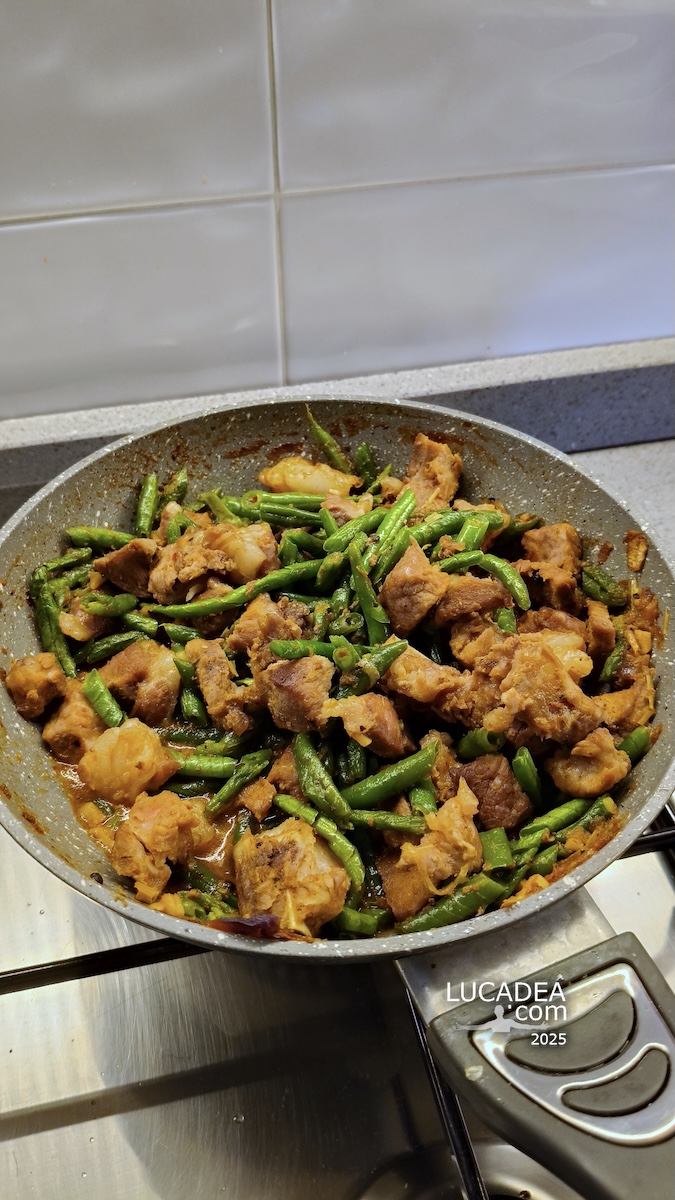
Padella di Đậu đũa xào thịt heo con fagiolini e maiale saltati in casa in Italia, piatto vietnamita casalingo ricco e saporito

Đậu đũa xào thịt heo cooked at home in Italy.
The smell of stir-fried long beans and pork fills my kitchen here in Italy, and every time I prepare Đậu đũa xào thịt heo, I feel like I am reconnecting with my roots in Vietnam. This simple Đậu đũa xào thịt heo dish carries more meaning than just food for me; it is memory, family, and distance all in one pan.
I live in Italy, and cooking Đậu đũa xào thịt heo here has become part of my daily rhythm, blending Vietnamese tradition with Italian life. The sound of pork sizzling in the pan, followed by the fresh green beans, creates a familiar harmony that reminds me of home kitchens in Vietnam. Even here in Europe, the spirit of Đậu đũa xào thịt heo remains unchanged.
While I cook, I often think about how food travels with us. My husband watches me prepare this dish, curious about every step, and for him it is a small window into another culture. I sometimes write about similar Vietnamese dishes on my blog, especially those I adapt while living abroad, and this recipe is one of the most meaningful.
If you are visiting Italy or simply curious about Vietnamese home cooking, this is one of those dishes that shows how simple ingredients can create something deeply emotional. It is not just stir-fried beans and pork; it is a story in a pan.
A lesser-known detail is that this dish is often cooked in many variations across Vietnam, depending on the region, but the heart of it always stays the same: quick cooking, strong flavor, and family sharing.

Ingredients

– Long green beans (đậu đũa);
– Pork pieces;
– Garlic;
– Fish sauce;
– Soy sauce;
– Oil;
– Salt and pepper.

Preparation

First, I prepare all the ingredients ahead of time, as this dish requires quick, high-heat cooking. I cut the long green beans (đậu đũa) into pieces about 4–5 cm, trying to keep them the same size for even cooking. I choose a slightly fatty pork, so it remains more tender and flavorful in the pan, and I cut it into bite-sized pieces.
I heat a wok or a large skillet with a drizzle of oil. Once the oil is hot, I add the minced garlic and let it brown slightly, being careful not to burn it, as this would give the dish a bitter flavor.
At this point, I add the pork and sauté it over medium-high heat. I let it brown well on all sides, until it turns a light golden brown and begins to release its aroma. If needed, I add a pinch of salt and a grind of pepper to immediately flavor the base.
When the meat is almost cooked (but still slightly tender), I raise the heat and add the green beans. I quickly sauté them with the meat, stirring often to blend the flavors without letting them become too soft: they should remain crunchy and maintain their bright green color.
At this point, I pour in the fish sauce and a small splash of soy sauce. The aroma immediately changes, becoming more intense and “Vietnamese.” I continue sautéing everything for a few minutes, until the green beans are cooked but still firm and the meat is perfectly coated in the sauce.
If the dish is too dry, I add a tablespoon of hot water to create a light sauce that binds the ingredients better.
Before turning off the heat, I taste and adjust if necessary with a splash of fish sauce or a pinch of pepper.
I serve the Đậu đũa xào thịt heo immediately, still steaming hot, often accompanied by plain white rice, which perfectly absorbs the juices from the meat and green beans.

And every time I serve it, I ask myself again: how can something so simple feel so close to home even when you are far away? Add a comment or go to the bottom of the site to read what other visitors have written.

Photos taken with Honor 20.

Add one  comment to this article or read  here what other visitors have written.
 
Adv
 
Disclamer

The rights on images, videos, choruses, text and all other material on the LUCADEA.com website are governed as per  Copyright page.

This page has been viewed 1 times today.
This month it has been viewed 1 times.
In total it has been viewed 1 times.
 

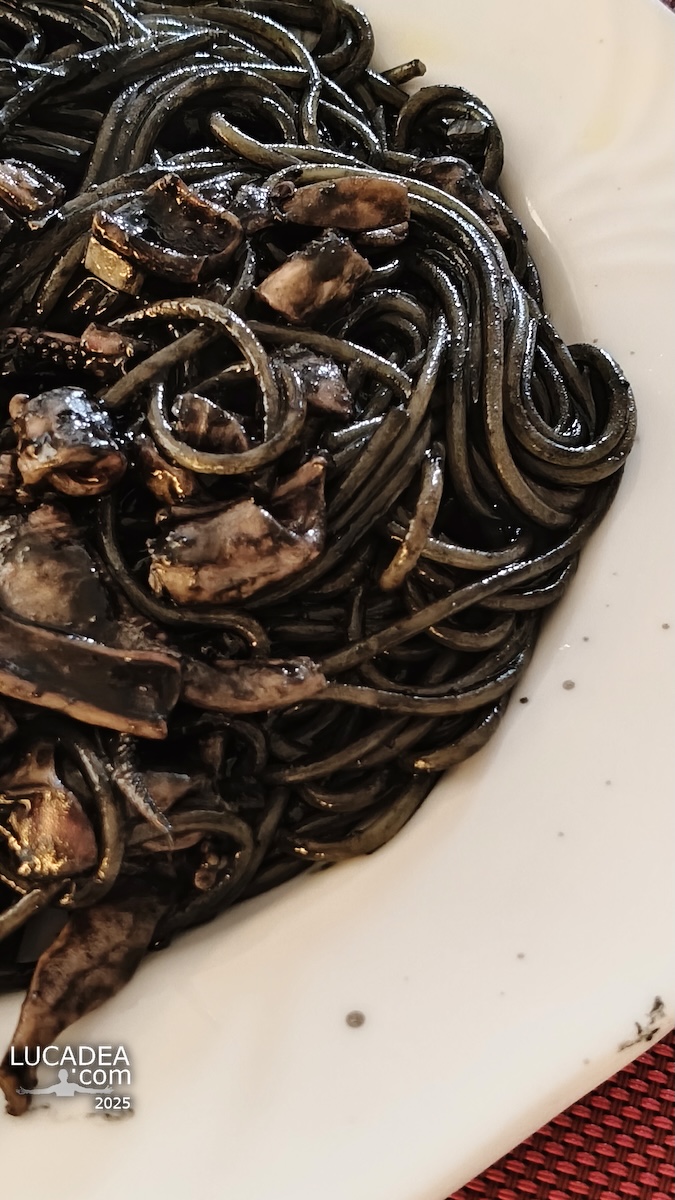
Squid ink spaghetti, the recipe

Piatto di spaghetti al nero di seppia cremosi con prezzemolo su fondo scuro

Squid ink spaghetti, the recipe.
There are dishes that instantly bring the sea to mind, and squid ink spaghetti is definitely one of them for me. That deep, glossy black color already tells a story before you even taste it. It’s a recipe I’ve come to appreciate over time, especially after learning how such simple ingredients can create something so bold and distinctive.
Making it is not complicated, but it does require attention to detail, especially when handling fresh squid. The key lies in respecting the main ingredient and building a sauce that is rich, smooth, and balanced without overpowering its natural flavor.

Ingredienti

– spaghetti;
– fresh squid (with ink sac);
– garlic;
– extra virgin olive oil;
– white wine;
– parsley;
– salt;
– pepper.

Preparazione

Start by carefully cleaning the squid. Gently remove the ink sac without breaking it and set it aside. Rinse the squid thoroughly under running water, remove any remaining parts, and slice it into thin strips.
In a large pan, heat a generous drizzle of extra virgin olive oil and add a clove of garlic. Let it cook on low heat until fragrant, making sure it doesn’t burn. Add the squid and sauté for a few minutes, stirring regularly.
Pour in a splash of white wine and let the alcohol evaporate completely. Once the squid starts to soften, lower the heat and add the ink, dissolving it with a bit of warm water. Stir well until the sauce becomes smooth and evenly black.
Meanwhile, cook the spaghetti in salted boiling water. Drain them al dente and transfer directly into the pan with the sauce. Toss everything together, adding a bit of cooking water if needed to achieve a creamy consistency.
Finish with chopped parsley and a touch of black pepper. The final result should be rich, silky, and well combined.

Do you enjoy the bold flavor of squid ink or do you prefer milder seafood dishes? Add a comment or go to the bottom of the site to read what other visitors have written.

Photos taken with Oppo Reno 12.

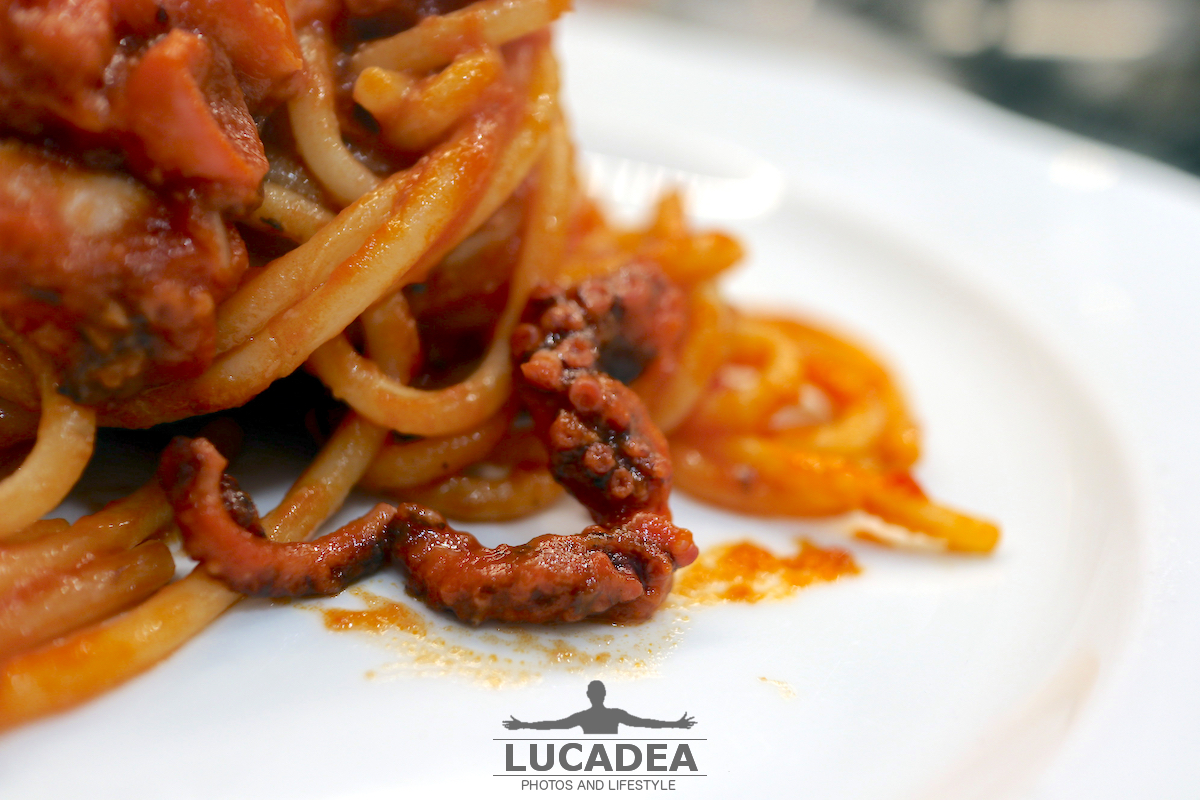
Spaghetti with Octopus Sauce, A Great Result

Spaghetti con il sugo di polpo

Spaghetti with Octopus Sauce, A Great Result.
Some time ago I decided to try making this dish myself and, while I was preparing it, I realized that the final result might be worth photographing as well. The octopus sauce had a thick, rich appearance, while the spaghetti seemed perfect for holding onto all that flavour.
I took this photograph to capture the final result of that preparation. The main subject is not simply a plate of pasta, but the combination of spaghetti and a rich octopus sauce with plenty of character. Looking back at the image, what I remember most is the satisfaction of getting something that worked well both on the plate and in the photograph.
Making spaghetti with octopus sauce is not simply a matter of adding a seafood topping to pasta. Octopus has a distinctive flavour and texture, and when it becomes part of a sauce it can give the whole dish a particularly deep taste. On this occasion, I liked the result because the sauce remained thick enough to coat the spaghetti properly.
The pasta itself also played an important part. The spaghetti I used had been given to me by a colleague, and I have to say that they turned out to be excellent. I really liked their texture, and together with the sauce they helped make the dish even more satisfying.
There is also the photographic side of the preparation, which for me often goes hand in hand with cooking. When I make something that turns out particularly well, I like to capture it before sitting down to eat. In this case, the spaghetti covered in sauce already looked convincing enough, so there was no need to build an elaborate setting around the plate.
Perhaps the most interesting thing is precisely that simplicity. A plate of pasta can be very photogenic when the ingredients are easy to recognize and the sauce has enough body to create texture across the pasta. Here, the octopus sauce remains the star without the need for decorative additions.
I do not want to rewrite the actual recipe here, because there is already a related post on the blog. If you would like to try making the dish, you can find the preparation in Loris’s post about octopus sauce, which was the reference I used. It also creates a natural connection between this photograph and another piece of content on the site.
As for the spaghetti, as I mentioned, they were a gift from a colleague. They were made by Regina dei Sibillini, and after tasting them I thought they deserved to be mentioned alongside the photograph.
One thing I enjoy about keeping a photoblog is being able to preserve these small experiments too. Not every photograph needs to be about a journey, a monument or a landscape. Sometimes a homemade dish is enough, especially when the image also records the satisfaction of having prepared it yourself.
Looking at this photograph again now, I would still give the result a positive review: the sauce was thick and full of flavour, the spaghetti were excellent and, at least in my opinion, the photograph turned out rather well too.

Have you ever made spaghetti with octopus sauce? Add a comment or go to the bottom of the site to read what other visitors have written.

Spaghetti with octopus sauce served on a plate, with the thick seafood sauce coating the pasta

Spaghetti with octopus sauce served on a plate, with the thick seafood sauce coating the pasta

Photos taken with Canon EOS M100 and lens Canon EF-M 22.

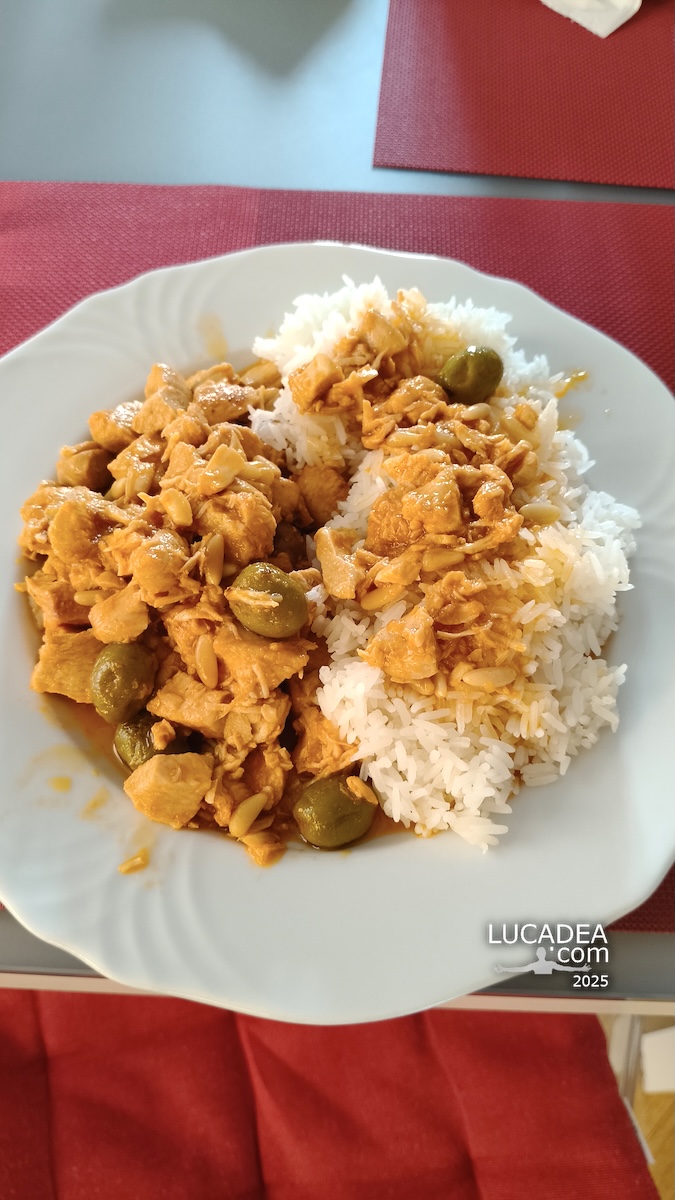
Chicken with white wine, olives and pine nuts, the recipe

Pollo al vino bianco con olive e pinoli servito con riso Jasmine in un piatto semplice e casalingo

Chicken with white wine, olives and pine nuts, the recipe.
Some dishes don’t need refinement or reinterpretation because they already carry meaning through memory and repetition. This chicken with white wine is one of those recipes that instantly takes me back to familiar moments, where simple ingredients were enough to create something deeply satisfying. The scent that rises as the onion begins to soften in olive oil is unmistakable, warm and comforting in a way that feels almost instinctive.
As I cut the chicken into small pieces, I think about how little this recipe has changed over time. Chicken with white wine develops gradually, allowing each ingredient to play its role without rushing. The green olives bring a slightly salty contrast, balancing the sweetness of the onion, while the pine nuts add a softer, richer texture that makes every bite more interesting.
When the chicken starts to brown, a light crust forms on the surface, and that’s the moment everything begins to come together. Pouring in the white wine transforms the dish, creating a deeper aroma that fills the kitchen. It slowly evaporates, binding all the flavors into something cohesive and inviting. It’s hard not to check on it repeatedly, drawn in by the evolving smell.
A small but interesting detail is that cooking meat with white wine is a common Mediterranean technique, as the acidity helps tenderize the meat while enhancing its natural flavor rather than masking it.
Recently, I’ve been serving this chicken with white wine alongside Jasmine rice, which absorbs the sauce beautifully and completes the dish without overwhelming it. It’s a simple combination, yet it works incredibly well, bringing everything into balance.

Ingredients

– Whole chicken breast;
– Jasmine rice;
– Tomato paste;
– Onion;
– White wine;
– Green olives;
– Pine nuts;
– Extra virgin olive oil;
– Salt.

Preparation

First, sauté the chopped onion in a saucepan with plenty of oil. Once the onion is well browned, add the diced chicken breast and tomato paste.
Toast the chicken and add the salt, olives, and pine nuts.
When the chicken has developed a light crust, add plenty of white wine.
Cook over medium heat for about 40 minutes.
Meanwhile, cook the jasmine rice (you can use a rice cooker), which will be ready in about 15 minutes.
Combine everything and serve hot.

Do you have a recipe that instantly brings you back to a specific memory? Add a comment or go to the bottom of the site to read what other visitors have written.

Photos taken with Oppo Reno 12.

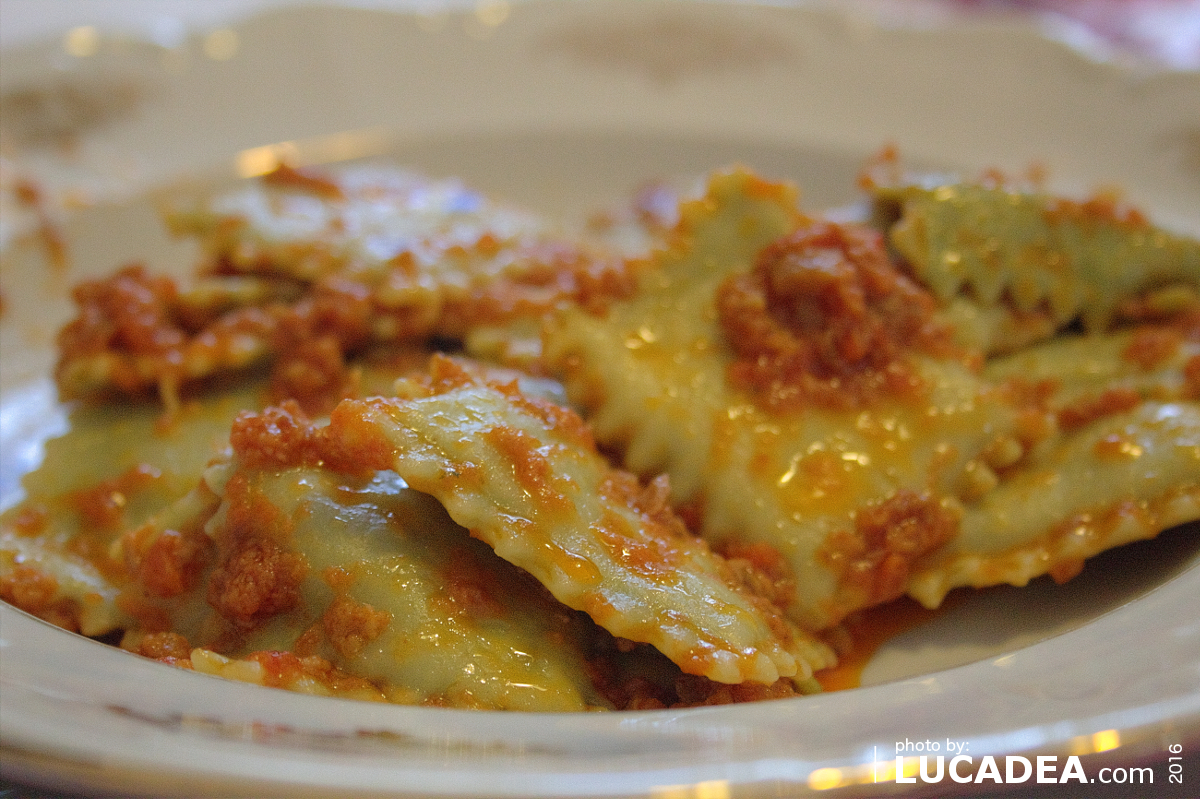
Homemade ravioli for Christmas lunch

Piatto di ravioli fatti in casa preparati per Natale, fotografati in dettaglio durante un momento familiare

Homemade ravioli for Christmas lunch.
Even though several days have already passed, I had kept this macro photograph aside: a beautiful plate of homemade ravioli prepared by my mom for last Christmas lunch. Fresh filled pasta and Italian home cooking are subjects that, even when photographed many times, always have something personal to tell.
This image comes from a very simple moment: a family meal and the desire to preserve its memory through photography. Homemade ravioli are not just a traditional dish, but often represent a connection between generations, made of familiar gestures, carefully chosen ingredients and time spent preparing something special.
I know that I have already shared other food-related images on my photoblog, but every time I find a reason to add another photograph. Like the fresh tagliatelle with meat sauce I wrote about in another article, this image is not only about the food itself, but also about everything behind a homemade dish.
The photograph focuses on the details of the ravioli, trying to capture the shape of the pasta and the inviting appearance of the plate. There is no distant destination or famous place behind this picture, but one of those everyday moments that are part of my life and that sometimes deserve a place on the blog.
Italian cuisine includes countless regional traditions, and ravioli are one of the best-known examples of filled pasta. Every area has its own versions, with different fillings and sauces depending on local habits and family recipes.
For me, photographing homemade ravioli also means telling a family memory. It is about sharing something simple, without always needing to search for unusual locations or extraordinary subjects. Sometimes a dish prepared at home can create an image capable of transmitting a feeling.
This photograph may not be something completely new for those who have followed my website for a long time, but I believe some images deserve to be published because they represent authentic moments.
If you are looking for the charm of Italian home cooking, sometimes the most interesting stories can be found around a family table rather than in a distant place.

What homemade dish reminds you most of your family moments? Add a comment or go to the bottom of the site to read what other visitors have written.

Piatto di ravioli fatti in casa preparati per Natale, fotografati in dettaglio durante un momento familiare

Photo taken with Canon 600D and Canon 18-55 EFS.

Homemade ravioli for Christmas lunch – Raviolis faits maison pour le déjeuner de Noël – Ravioles caseros para el almuerzo de Navidad – Ravioli caseiros para o almoço de Natal – Hausgemachte Ravioli zum Weihnachtsessen – Bánh ravioli tự làm cho bữa trưa Giáng sinh – 圣诞午餐的自制意大利饺子 – クリスマスランチの自家製ラビオリ

The text of this post was written with the help of ChatGPT, a language model from OpenAI.

A Turkish dish in Barcelona: Kofte Kebab

Un piatto turco a Barcellona: Kofte Kebab

A Turkish dish in Barcelona: Kofte Kebab.
When I’m in Barcelona, ​​I like to try some Turkish food for a change. I normally opt for the classic kebab, but last time I tried this dish.
In the vast universe of Middle Eastern cuisine, few dishes can match the unmistakable taste and enveloping aroma of Kofte Kebab. Originally from Turkey, this dish has spread throughout the world thanks to its simplicity, versatility, and, above all, its incredible flavor.
Kofte Kebab is a classic of Turkish cuisine, with roots dating back centuries. “Kofte” comes from the Persian word “kufta,” meaning “minced” or “chopped,” while “kebab” is a Turkish word that refers to a dish cooked on a grill or skewer. This combination of minced ingredients and grilling makes Kofte Kebab a dish as delicious as it is rich in history.
The basic recipe for Kofte Kebab calls for minced meat, traditionally lamb or beef, although chicken or turkey variations are also common. Key ingredients include onion, garlic, parsley, and a combination of spices that can vary depending on personal taste and region. Common spices include cumin, black pepper, chili powder, and sweet or smoked paprika.
Once the ingredients are mixed, the meat is shaped into small patties or elongated shapes, skewered, and then grilled until evenly browned and juicy. This open-fire cooking process gives Kofte Kebab its distinctive smoky, aromatic flavor that makes it so irresistible.
Like many traditional dishes, Kofte Kebab has numerous regional variations that reflect different culinary influences and local preferences. For example, in the Black Sea region of Turkey, it’s common to add soaked and mashed stale bread to the meat mixture to impart a softer texture and a slightly different flavor. In contrast, in southeastern Turkey, kofte are often served with spicy tomato sauce or yogurt.
Kofte Kebab is often served with fresh and colorful side dishes, such as tomato and cucumber salad, thinly sliced ​​red onions, fresh parsley leaves, and squeezed lemon. These accompaniments not only add a refreshing note to the meal, but also perfectly balance the rich, intense flavors of the kebab.
The dish can be served on a bed of pilaf rice or accompanied by freshly baked flatbread, such as traditional “pide,” or Turkish bread. Some kofte kebab lovers also prefer to add a generous helping of yogurt sauce, enriched with garlic and mint, for an extra touch of freshness and creaminess.

In conclusion, kofte kebab is much more than just a plate of grilled meat; it is a symbol of conviviality, tradition, and culinary passion. Its simple yet delicious recipe and endless possibilities for customization make it a cornerstone of Middle Eastern cuisine beloved around the world. Whether you enjoy it in an authentic Turkish restaurant or prepare it yourself in the kitchen, Kofte Kebab is definitely a culinary treasure to be appreciated and enjoyed.

Add a comment or scroll down to read what other visitors have written.

Un piatto turco a Barcellona: Kofte Kebab

Photo taken with Honor 20.

Here’s where the restaurant is located:

A Turkish dish enjoyed in Barcelona: Kofte Kebab – Un plat turc apprécié à Barcelone : le Kofte Kebab – Un plato turco que se disfruta en Barcelona: Kofte Kebab – Um prato turco apreciado em Barcelona: Kofte Kebab – Ein türkisches Gericht, das man in Barcelona genießt: Kofte Kebab – Một món ăn Thổ Nhĩ Kỳ được thưởng thức ở Barcelona: Kofte Kebab

The text of this post was written with the help of ChatGPT, a language model from OpenAI.

Homemade tonnarelli cacio e pepe pasta

Un piatto di tonnarelli cacio e pepe fatto a casa

Homemade tonnarelli cacio e pepe pasta.
A plate of freshly prepared tonnarelli cacio e pepe is one of those simple subjects that can still tell a meaningful story: home cooking, traditional flavors and the pleasure of preparing something familiar and loved. I photographed this dish to capture an everyday moment, with pasta covered with grated cheese and black pepper, ready to be enjoyed.
Tonnarelli cacio e pepe is one of the most representative dishes of Roman cuisine and, despite having only a few ingredients, it requires attention to achieve the perfect balance. This photograph shows a homemade version, using tonnarelli bought ready to cook and finished with the traditional combination of pecorino cheese and pepper.
The beauty of this pasta dish comes from its simplicity. There are no unnecessary additions: pasta, cheese and pepper must work together to create a smooth and flavorful sauce. The most important part of the preparation is combining the pecorino with the pasta cooking water to create a creamy texture, making sure the cheese blends properly instead of becoming dry.
I wanted to photograph this plate because homemade recipes often preserve the most personal memories. This is not a dish created for a special event or a restaurant menu, but a small daily pleasure connected with familiar habits. Even a simple bowl of pasta can become an interesting photographic subject when it tells something about the person who prepared it.
For those searching how to prepare tonnarelli cacio e pepe, the recipe may look easy, but a few details can make a big difference. In my article dedicated to the preparation, I shared some useful suggestions to achieve a smoother sauce and improve the final result: you can read my tonnarelli cacio e pepe recipe here.
A small curiosity about the name comes from the word “cacio”, a traditional term used in central Italy to refer to cheese. In the most famous Roman version, pecorino romano is the key ingredient, giving the dish its strong flavor together with freshly ground pepper.
This photograph belongs to the same kind of personal stories I like to share on my blog, where food, places and memories often meet. Like the markets I have photographed around the world, a homemade dish can also reveal a culture through ingredients, traditions and everyday gestures.

It is a simple recipe that never seems to lose its appeal: what dish do you enjoy preparing most at home? Add a comment or go to the bottom of the site to read what other visitors have written.

Photos taken with Honor 20.

Cacio e pepe is a typical dish from Lazio. As the name suggests, the ingredients are very simple and include only black pepper, Pecorino Romano cheese, and pasta. The most traditionally used type of pasta is tonnarello. Like other dishes from Lazio cuisine, it is prepared with simple, readily available, and shelf-stable ingredients (during the transhumance period, food was not easy to obtain). Its roots lie in the cuisine of farmers and shepherds in the Roman countryside.
Continue and learn more at Wikipedia

Spaghettoni with pistachio pesto and shrimp, the recipe

Spaghettoni al pesto di pistacchi e gamberi, la ricetta

Spaghettoni with pistachio pesto and shrimp, the recipe.
There are dishes that remain linked to a specific place, even when you recreate them at home. These spaghettoni with pistachio pesto and shrimp immediately take me back to the Costa Toscana cruise ship, sitting at the Ferrari Bar, with the sea slowly flowing by outside and the muffled sound of the ship as background. I enjoyed them last year, without thinking too much about it, and only later did I realize that the taste had stayed with me more than expected. The sweetness of the shrimp, the creamy pistachio, the thick pasta that held everything together naturally.
It’s a recipe that is simple, but not trivial. It doesn’t need excesses: it works precisely because each element remains recognizable, without overpowering the others. Recreating it means seeking that balance, not a perfect copy (also because there are professional chefs there), but the same feeling.

Ingredients

– Durum wheat spaghettoni;
– Fresh or pre-cleaned shrimp;
– Shelled unsalted pistachios;
– Extra virgin olive oil;
– Grated Parmigiano Reggiano cheese;
– One small clove of garlic;
– Salt;
– Black pepper (optional);
– Zest of untreated lemon (optional).

Preparation

I always start with the pistachio pesto. I put the pistachios in the blender with a generous drizzle of extra virgin olive oil, a little Parmigiano cheese and the clove of garlic. I blend in pulses, without aiming for a too smooth cream: it should remain slightly rustic. I adjust the salt and, if needed, add another drizzle of oil until I obtain a soft consistency.
Meanwhile, I bring the water to a boil for the pasta and cook the spaghettoni al dente. In a large pan, I lightly heat some oil and quickly sauté the shrimp, just long enough for them to change color. I turn off the heat: they should remain tender.
I drain the pasta, reserving a ladleful of the cooking water. I add the spaghetti to the pan, add the pistachio pesto and a little hot water to bind everything together. Only at the end do I add the shrimp, stirring gently. If I feel like it, I finish with a very light grating of lemon zest.
The dish is ready when it smells of the sea and pistachios together, without one overpowering the other.

Do you also associate certain dishes with a specific trip, rather than a particular cuisine?
Add a comment or go to the bottom of the site to read what other visitors have written.

These are photos of the dish I enjoyed on board:

Photos taken with Oppo Reno 12.

Spaghettoni with pistachio pesto and shrimp – Spaghettoni au pesto de pistaches et crevettes – Espaguetones con pesto de pistacho y gambas – Esparguete grosso com pesto de pistácio e camarões – Spaghettoni mit Pistazienpesto und Garnelen – Mì spaghetti sợi lớn sốt pesto hạt dẻ cười và tôm – 开心果香蒜酱虾仁粗意大利面 – ピスタチオペーストと海老のスパゲットーニ

The text of this post was written with the help of ChatGPT, a language model from OpenAI.

Shrimp carbonara penne, the recipe

Penne alla carbonara di gamberi, la ricetta

Shrimp carbonara penne, the recipe.
There are dishes that are born almost by chance, from the idea of ​​combining two worlds that don’t usually meet. This shrimp carbonara is one of those recipes I prepare when I crave something familiar but with a twist, a little detour to the sea. The penne pasta holds the cream well, the shrimp bring sweetness and saltiness, and the egg envelops everything without overpowering the flavors. It’s a recipe that requires attention, but it rewards you with a surprising balance.

Ingredients

– Penne pasta;
– Fresh peeled shrimp;
– Very fresh eggs;
– Grated Pecorino Romano cheese;
– Black pepper;
– Extra virgin olive oil;
– Garlic;
– Salt.

Preparation

I immediately put the water for the pasta to boil, salting it moderately: the Pecorino cheese will do the rest later. In the meantime, I prepare the shrimp. I clean them carefully, removing the dark vein, and set them aside. In a large pan, I heat a little oil with a slightly crushed clove of garlic, just to add flavor. When the oil is hot, I add the shrimp and let them cook for a few minutes, just until they change color and become tender. I remove them from the heat immediately, preventing them from drying out, and remove the garlic.
In a bowl, I break the eggs, separating the yolks from the whites if I want a richer cream. I add the grated Pecorino cheese and plenty of freshly ground black pepper, mixing until I get a thick and fragrant cream. The pasta water starts to boil: I add the penne and cook them al dente, reserving some of the cooking water.
When the pasta is ready, I transfer it directly to the pan with the shrimp, with the heat turned off. I add the egg and Pecorino cheese cream and stir vigorously, using a few tablespoons of the pasta cooking water to obtain a smooth and glossy consistency. The cream should bind without scrambling the egg. If needed, I add a little more hot water. I taste, adjust the pepper, and serve immediately.

Do you like the idea of ​​a carbonara that looks to the sea instead of the more classic tradition? Add a comment or go to the bottom of the page to read what other visitors have written.

Foto scattate con Oppo Reno 12.

Shrimp carbonara penne recipe – Recette des penne à la carbonara de crevettes – Receta de penne a la carbonara de gambas – Receita de penne à carbonara de camarão – Penne Carbonara mit Garnelen Rezept – Công thức penne carbonara tôm – 虾仁培根蛋酱通心粉做法 – 海老のカルボナーラペンネ レシピ

The text of this post was written with the help of ChatGPT, a language model from OpenAI.

🏠
  • Italiano